


Replacing Brake Pads

Replacing Brake Pads is not a difficult task, but it is one that must be done properly. Learn how to change oil by following these steps. A correctly performed Replacing Brake Pads extends your vehicle's life while keeping you and the environment safe.
If you have recently driven, you may be working with extremely hot pads, calipers and rotors. Be sure that these parts are safe to touch before moving on.
Using the lug wrench provided along with the car's jack, loosen each of the lug nuts that hold the wheels onto the car about two-thirds of the way.
Don't loosen all the tires at once. Generally, you'll change at least the two front pads or the two back pads, depending on your car and how evenly the brakes wear. So either start with the front or the back.
Carefully jack the car up until it can be removed comfortably. Consult your owner's manual to determine the correct position for the car jack under your car. Put some blocks behind the other wheels to stop the car from rolling forward or back.
Place a jack stand under the frame of the vehicle. Do NOT trust the jack alone. Repeat for the other side of the car so that both sides are securely supported.
Remove the wheels. Finish loosening and removing the lug nuts when the car is raised.Pull the wheel straight out towards you to remove it.
If the wheel rims are alloy and on the studs, you should clean the studs, stud holes, rotor mounting surface, and the rear mounting surface of the alloy wheel with a wire brush and apply anti-seize compound before refitting the wheel.
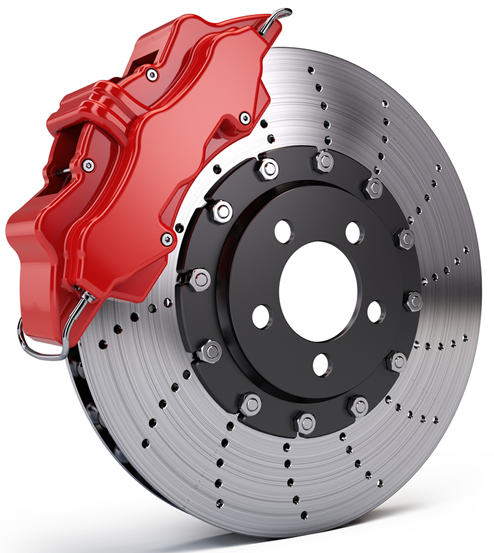
Remove the caliper bolts using the correct size of socket or ring-spanner.[1] The caliper fits over the brake rotor like a clamp and its job is to slow the wheel using hydraulic pressure. The brake pads will create friction with the rotors to slow the vehicle to a stop. Calipers generally come in one-piece or two-piece designs, secured with between two and four bolts at the inside of the stub axle housing, where the tire fits onto the axle.[2]Spray these bolts with WD-40 or PB Penetrating Catalyst to aid in removing them.
Check the caliper pressure. The caliper of a car at rest should move back and forth a little bit. If not, the caliper is under pressure and it may fly off when you remove the bolts. Take extra precaution when checking to keep your body to the side of its path,even if it is loose.
Remove the old pads. Finally! Note how each brake pad is attached. They typically snap or clip in with attached metal clips. Remove both pads. They may take a little force top op out, so take care not to damage the caliper or brake line while getting them out.
Inspect brake rotors for warped, heat damage or cracks to surface and replace as needed. Rotors are recommended to be replaced or resurfaced during brake pad replacements.
Check the brake fluid. Check your vehicle's brake fluid level and add some if necessary.Replace the brake fluid reservoir cap when finished.
Replace the caliper. Slide the caliper slowly back over the rotor, proceeding easily so as not to damage anything. Replace and tighten the bolts that hold the caliper in place.
Put the wheel back on. Slide the wheel back into place and hand tighten each of the lug nuts snugs before lowering the car.
Tighten the lug nuts. When the car is back on the ground, tighten the lug nuts in a "star"pattern. Tighten one lug nut, then one across from it until each nut is fully tightened to torque specification.
Check the owner's manual to find the torque specifications for your vehicle. This will ensure the lugs have been tightened enough to prevent the wheel coming off or over-tightening.
Making sure the vehicle is in neutral or park, pump the brakes 15 to 20 times to make sure the pad is seated properly. Top off brake fluid levels or follow bleeding of brakes section to flush out old fluid and replace with new fluid.
Going no more than 5 mph (8.0 km/h) on a quiet residential street, brake like normal. If the vehicle seems to stopping normally, repeat the test and go up to 10 mph (16 km/h).Repeat several more times, gradually going up to 35 or 40 mph (56 or 64 km/h). Also, check in reverse. These braking tests ensure there are no issues with your brake-pad installation, gives you confidence when driving on main streets and helps "seat" the brake pads into place.
Listen for problems. The new pads may squeak a bit, but i you should hear a grinding,metal-on-metal sound, you probably have the brake pads reversed (i.e., the inside surface is incorrectly facing out). This should be corrected immediately.

0 Reviews

Year
: 20250 Reviews

Year
: 20250 Reviews

Year
: 20260 Reviews

Year
: 20250 Reviews

0 Reviews
Item added to your wish List
Item added to your Compare List


